Sweet Pear Stew – A Simple Chinese Dessert

SONY DSC


You’ll probably hear me say this again and again. After I become a mother, I have a stronger desire to connect to my roots. I want my children to have a sense of heritage and a connection to the culture. So I started looking into more and more Chinese cuisine recipes.

Here’s the problem: I ย feel that Chinese dishes are kind of “Ma Fan” (Cantonese for troublesome and a hassle.) You have to learn about the new ingredients and prepping takes forever. I’ve got two young children so I’m about efficiency and convenience at this point of my life!

So when I see a dish that I want to try, I often ask myself: How do I “Stepherize” it? Meaning, adapting it so that it’s a quick and straight forward recipe. And I feel that many young moms of this generation would love recipes like that, too!

Anyway.

I love Chinese desserts. There’s a category of Chinese desserts that’s especially appealing to me: sweet soups. They are soups that are served hot and sweet, and the ingredients are all softened from stewing. And according to Chinese medicine and cultures, each kind of sweet soup serves to balance and rejuvenate certain functions of our bodies (That’ll be another post one day). So today, I’ll share with you my quick and easy Sweet Pear Stew.

For this recipe, you only need 3 basic ingredients: Ya-Li Pear, rock sugar, and water.

SONY DSC

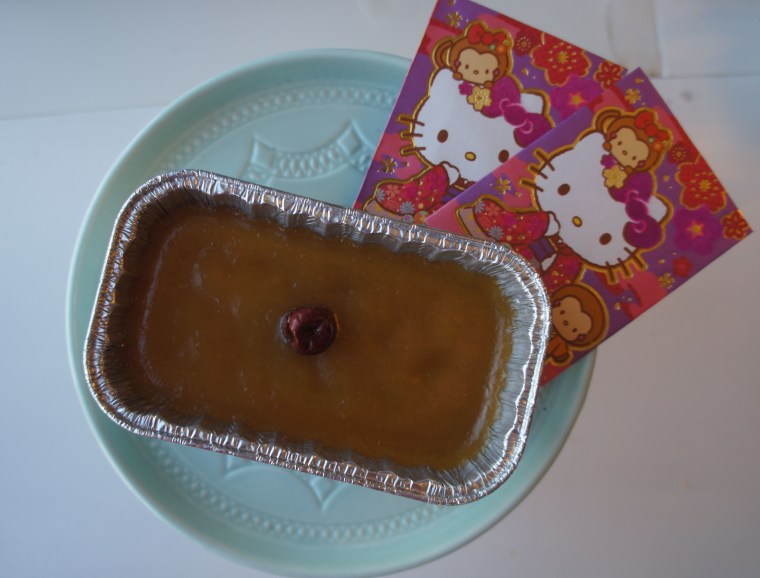
Richard got me this cute little pink ceramic pot in Hong Kong over Christmas, it’s perfect for making individual sized dessert!

I cut up my pear into small chunks so it would cook faster and it’ll fit in my little pot.

SONY DSC

Add enough water to fill the pot. Then put in your sugar. You decide how sweet you like the stew! I usually put in a few small chunks. Make sure you cut out the part that surrounds the core of the pear. If you don’t, it’ll make your stew slightly more tart.

SONY DSC

That’s how much rock sugar I use. Some times I put more, depending on what I feel like.

The next part is a little tricky. In Chinese cuisine, there’s a method of cooking called “dun” (Dun Dun Dun!!! ๐Ÿ˜€ sorry, couldn’t resist….). Which is kind of like steaming, except the container is half immersed in the boiling water. I guess it’s like when you melt your chocolate on a double boiler?

I make it work by using my sauce pan filled with with about 2-3 inches of water, then I use a small dish or a lid to elevate my pink pot so it is not in direct contact with the heat. Make sure you use something sturdy. And if it’s a small ramekin, fill it with some water facing up so that it won’t move around in the pot. Once, I made the mistake of putting it upside down, thinking it would make it more sturdy. Not engineer material right here!

SONY DSC

I found these in my kitchen that I can use to elevate my pink pot in the sauce pan: a jar lid, a porcelain ramekin, and a ginger grater. Basically, anything small and that you can put in boiling hot water.

SONY DSC

You can see the little ramekin underneath the pink pot here.

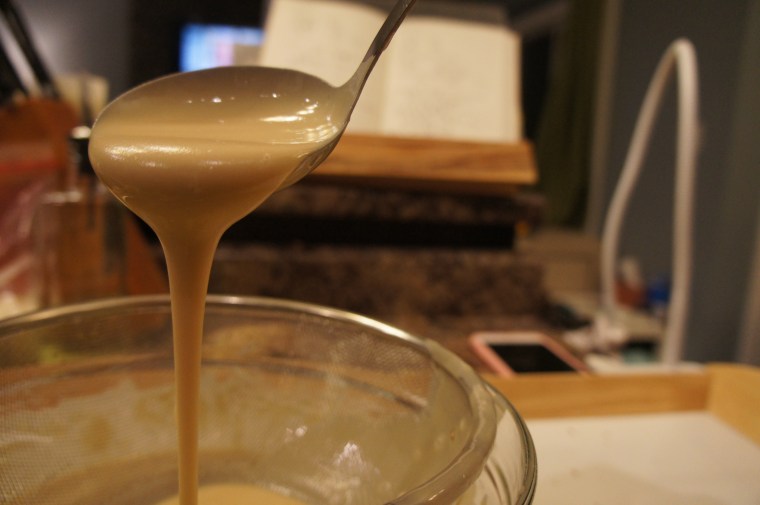
Stew it for about 20-30 minutes, and you have yourself a simple, healthy, and just perfectly fruit dessert stew! How easy is that? The best part? You have minimal dishes to wash after this!! (Can you tell I don’t like doing dishes? ๐Ÿ™‚ )

Drinking this Sweet Pear Stew often is supposed to help “sooth” your chi and hydrates your body. I’m not a medical profession, obviously, but this is what I was told by all the Chinese “po po’s” (grandmothers)! And grandma’s always know best!

Let me know how you like it!

Love,

Stephy


Chinese Sweet Pear Stew

1 ย  ย  Ya-Li Pear

Small chunk of rock sugar (approximately 10g. Adjust to taste)

1/2 Cup Water (depending on the size of your container)

  1. Cut the pear into small chunks.
  2. Put all ingredients into a porcelain container with a lid.
  3. Place a small dish or ramekin inside a sauce pan and fill it with enough water to touch the porcelain container.
  4. Place the lid on the sauce pan. Cook on medium for 20-30minutes.
  5. Serve hot.

You can add other ingredients into the recipe to enhance flavor. Try red dates or Chinese almonds.


IHeartYou Coasters

Happy Love Day! I have so many Valentines, I love this special day ๐Ÿ™‚ ! I really wanted to make something pink and cute for this day, but it has to be something easy and fast! So I decided to make coasters! Who wouldn’t want more cute coasters?!

SONY DSC

The original pattern came fromย Bella Dia, and it is meant to be a garland. I modified the pattern, shrinking it, and making it a bit taller, so its the perfect size for my tea mugs :).

Materials:

-I used an old ball of yarn in a pink color. It is a medium weight yarn. Any medium weight yarn will work really easily with this pattern.

-4.5mm hook

Stitches used:

ch: chain

sc: single crochet

inc: increase by making two stitches in the same stitch

dec: decrease by joining two stitches to become one

Pattern:

Ch 4.

R1. Sc second stitch from hook. Sc the rest of the row. Ch 1, turn. (3)

R2. Inc in the 1st stitch. Sc 1. Inc in last stitch. Ch 1, turn.(5)

R3. Inc in the 1st stitch. Sc 3. Inc in the last stitch. Ch 1, turn.(7)

R4. Sc all stitches across the row. Ch 1, turn. (7)

R5. Inc in the 1st stitch. Sc 5. Inc in the last stitch. Ch 1, turn. (9)

R6.ย Inc in the 1st stitch. Sc 7. Inc in the last stitch. Ch 1, turn. (11)

R7.ย Sc all stitches across the row. Ch 1, turn. (11)

R8.ย Inc in the 1st stitch. Sc 9. Inc in the last stitch. Ch 1, turn. (13)

R9.ย Inc in the 1st stitch. Sc 11. Inc in the last stitch. Ch 1, turn. (15)

R10.ย Sc all stitches across the row. Ch 1, turn. (15)

R11. Inc in the 1st stitch. Sc 13. Inc in the last stitch. Ch 1, turn. (17)

SONY DSC

R12. Begin making one of the lobe of the heart. Sc 8. Ch 1, turn. (8)

DSC02511.JPG

R13. Dec 1, sc 4, dec 1. (6)

R14. Dec 1, sc 2, dec 1. (4)

R 15. Dec 2 (2). Fasten off.

Part 2:

R1. Insert yarn at 9th stitch in R12. Ch 1, sc 8. Ch 1, turn. (8)

SONY DSC

R2. Dec 1, sc 4, dec 1. (6)

R3. Dec 1, sc 2, dec 1. (4)

R4. Dec 2 (2). DO NOT fasten off!

Sc all the way around the heart. At the tip of the heart (the pointy part), sc 1, ch 1, sc 1. Fasten off and sew in lose ends.

DSC02519.JPG

To make the coaster nice and flat, mist it with water and pin it down flat and let dry. (Or look up “crochet blocking”)

I love making coasters because they are fast and easy! It doesn’t take much yarn, and you can pretty much make whatever shape you want. An instant crochet “happy sigh” moment ๐Ÿ™‚ ! I made a few smaller hearts just because it’s cute! They are made by crocheting in rows rather than in rounds (or with magic ring). You can find the pattern here.ย I like that better because there isn’t a hole in the middle of the heart. We can’t have a hole in any heart!!

Now go and give out lots of hugs and kisses today!!

Happy crocheting!

SONY DSC

I’m so new with designing and modifying patterns! Please let me know if any clarification is needed, or if there is any error in the pattern!

If you wish you share this pattern, please link to this site. Thankย you.ย 

“Playing” the Piano

So the other day when both boys were up and I have a free moment, I decided to go play my piano for a bit. Okay, if you are a mom, or have young toddlers in your life, The Murphy Law of Mom with toddlers states, “Anything that you are doing, your toddler will want to do”. Jordan immediately came to see what I was doing (I had literally began to play the second bar of my music…. ๐Ÿ˜ฅ ! ).

He started helping himself to smashing the piano. I had enough sleep that day so I was able to think instead of react and tell him to stop, which probably wouldn’t work so well anyway. So instead, I said “Oh that’s really loud music you are playing! Sometime real pianist plays music that’s loud and low like that!”

And that began our piano play time that I had not anticipated.

piano1

(Sorry for the picture quality! I need to work on taking a photo and playing at the same time! :p )

We played with all kinds of sounds, style, and tempo: loud, soft, high, low, fast, slow, bouncy, long, short. He also got some fine motor play as we played using different fingers. And his favourite was, of course, key smashing lol.

Jordan had a blast experimenting and playing the piano. I do have to say that I’m not trying to “teach” him piano (Piano teachers out there, I’m sure you have more “proper” way of teaching piano ๐Ÿ™‚ ), it was just a moment of play.

And we always have fun playingย ๐Ÿ™‚ .

piano2


Chinese New Year Cakes

ningo1.jpg

Chinese New Year Cakes are like ย a taste of childhood. They are warm, sweet and chewy, with a hint of ginger or coconut flavour. I began making my own Chinese New Year Cakes a few years ago, while I was pregnant with Jordan. At the time, I was thinking about the family traditions that my new family would have. I asked myself, “What will my children remember about their childhood?”

I knew right away that I would want my children to remember something special about Chinese New Year. Yes, they will, of course, remember the red envelops that they are going to get, but I want them to remember “the taste of Chinese New Year”. So I decided to start with the New Year Cakes. I will call them Nin Go from here on (The Cantonese name).

There are generally two types of Nin Go: Ginger Cane Sugar and Coconut. I personally likes the ginger one more, so that’s the only one that I make :). Richard loves anything chewy and sticky so Nin Go is perfect for him. He often eats half a Nin Go in one sitting.(Word of caution here, Nin Gos are quite filling. Eating too much in one go will result in the “clomp in your tummy”kind of feeling! Haha! Don’t say I didn’t warn you!) Either kind of Nin Go is super easy to make, and ingredients are easily accessible at your local Chinese market. So take a look and what I have here and give it a whirl!

Since I usually make the Ginger Cane Sugar Nin Go, that’s what you will see here in this post. You can easily adapt the recipe to make Coconut Nin Go ๐Ÿ™‚ !

Ready? It’s super easy to make and very low maintenance. First, your ingredients.

nin go2.jpg

These, my friends, is all that you will need to make Nin Go. You can easily get them at your local Chinese grocery stores. (The coconut milk here for this Nin Go is optional. I use just a table spoon of it for a hint of color and flavour. You can omit them if you don’t want to have to wonder what to do with the rest of the can of coconut milk.)

I start by making the cane sugar syrup for the Nin Go. Boil 2 cups of water, 300g of the cane sugar, and a few slices of ginger together for a few minutes until the cane sugar dissolves. Let the mixture cool (I just pop it in the fridge for half an hour.)

DSC02484.JPG

When your sugar syrup has cooled to room temperature, add in 1 tbsp of the coconut milk (if you choose to). At this point, you can add the syrup to the flour mixture. Does it really matter what you add to what? The answer is, I have tried both ways and I don’t notice a difference ๐Ÿ˜› . So do as you like! The mixture will be clumpy but don’t worry! These will help:

nin go3.jpg

It doesn’t really matter what size of a sift you have. Of course the bigger the easier, but whatever gets the job done! Run the batter through the sift twice to ensure a smooth batter. Your batter should run like a thin pancake batter.

DSC02487.JPG

If you find your batter too thick, just add a couple of table spoons of water to thin it down. ย I find runnier batter result in a softer Nin Go. Just make sure that you don’t put too much water in or else you’ll have a blob of Nin Go instead of something that has a shape.

And the Nin Go is ready to be poured into the containers and steamed!! This recipe will fill an 8″ round pan (about 3/4 full), or a few of these small loaf pans.

DSC02488.JPG

I usually steam the 8″ size for about an hour on medium high heat (on my stove it’s 8), or 50 minutes for these little guys in the picture. As soon as they are done, I like to put a red date in the middle for decoration. Just a pop of color ๐Ÿ™‚ ! Then I leave them in the steamer to cool off.

SONY DSC

Tah Dah!!!

Richard, my hubby, likes to eat them fresh and warm as it is. Or you can also prepare them the traditional way: dip them in eggs and pan fry them on low until golden brown and soft. If you use medium heat or higher, you will burn them before they become soft and chewy! Good food takes patience!! The best thing that I love about Nin Go is that they can last a while in the fridge. Yes they may look like they have hardened, but as soon as you pan fry them, they will be soft as new!Genious, right?! Make sure you always serve them hot/warm. If they even last that long for them to cool off, you can always microwave it for 10-15 seconds to warm them up again!

This year, I have made many batches of Nin Go for friends and family. It’s my way of wishing them a good year, and a token of love from me to them. I made little Chinese New Year gift tags to go with them! I love that picture of my boys:)

DSC02499.JPG

And that, my friends, is my Chinese New Year Nin Go! It will be Chinese New Year tomorrow, but It’s not too late to whip up your first batch of Nin Go to celebrate! We wish you a wonderful and prosperous year of the Monkey, and may you and your family fill this year with many happy memories. Gong Hei Fat Choi!! Happy New Year!

DSC02492.JPG


Stephy’s Nin Go Recipe

ย  2-1/2Cups of glutinous rice flour

ย 300g of cane sugar

1/2cup + 2 tbsp wheat starch

2 cups of water

1 tbsp of coconut milk (optional)

a few slices of ginger (about the size of a large coin. More if you like ginger flavor, like me)

1. Make sugar syrup by boiling the 2 cups of water on the stove. Add in cane sugar and ginger. Let the syrup cool to room temperature.

2. In a large mixing bowl, mix the glutinous flour with the wheat starch.

3. When the syrup has cooled off, add into the flour mixture. Mix until combine. Batter will be clumpy.

4. Sift the mixture twice to dissolve everything.

5. Oil the containers, pour batter into the containers about 3/4 of the way. Be careful not to over fill them as it will be difficult for you to put them into the steamer.

6. Steam Nin Go for 50minutes to 1 hour. You know your Nin Go is done when you test it with a skewer and the skewer feels sticky inside the Nin Go.

7. Enjoy it fresh and warm as it is, or dip them in eggs and pan fry them on low for a golden, warm, and decadent treat!

I have combine several recipes and adapted them to make this my very own Nin Go recipe. Should you want to share it on your site, I would appreciate it if you would credit to this site or to link to my blog. Thanks! ๐Ÿ™‚